Sunday, July 14, 2013

Are You Ready For Soap Porn?

If you are, you've come to the right place!

We recently had these amazing shots taken by the super talented Gabbie Hine

I like to think of them of "soap art"!

 Sweet Like Candy

Sea of Swirls 

Heaven Scent

Pinks and Greens

Orange Creamsicle

Dark Clean

High Tea

Pastel Rainbow

Tiger Stripe

Lavender Swirls

Lavender and Mint

Bubbles of Love

Pure Clean

Ocean Waves

Pretty in Pink

P.S. They are all available to buy as greeting cards, calendar or posters HERE!


Tuesday, July 9, 2013

Soapmaking Thesis


I've been working hard perfecting my soapmaking course over the last few weeks ... what began as a small few pages has turned into a monster! Super excited to get this finished though. You could call it my soapmaking thesis ...

The bulk of the chapters have been written, now just making notes and going over each one.
Colourants and fragrance preparation for Banoffee Pie soap tutorial (below). 
Banoffee Pie soap, freshly cut. This was made using a faux funnel swirl. Want to learn to make one like it? I teach it in the soapmaking course!

Sign up to stay updated on my soapmaking course, using the sign-up form on the right ;-)


Sunday, June 9, 2013

Lining Your Mould with Contact Paper - Step by Step

As some of you may already know, I'm in the process of creating a course on how to make soap: everything from the basics through to advanced techniques. One of the tutorials I've just finished is how to line your soap mould. I know from experience that this can be a source of frustration for many soapmakers! My technique is quick and easy to learn, and I thought I would share it here.

1. Choose your mould. I'm using a wooden 2-log mould, but only lining one side.
    

 2. Cut the length of contact paper that you need. Make sure it’s long enough to cover the bottom and both side of the mould.


 3. Put the contact paper over the top of the mould, shiny side up. Use your nail to press a line of the inside edge of the mould onto the contact paper, all the way around.

 4. Fold over each line that you’ve made, folding inwards, creating four creases in the paper.

 5. Cut four slits into the paper, two at the bottom, and two at the top, as shown below. 

 6. Fold the middle tab up.

 7. Fold the left tab over.


 8. Fold the right tab over.


 9. Repeat steps 6-8 with the other end of the paper.

 10. You should now have a box shape that you can slot into the mould.

 11. If you have excess paper hanging over the top, make cuts in the corner creases, and fold the edges down.

 12. Tape the paper to the side of the mould to prevent it from moving around.

 13. Your mould is now lined and ready to use!

Tips: 
● This method can work with other materials such as baking paper or freezer paper, however it can be tricky as it doesn’t hold the shape as well. 
● Use clear contact paper rather than coloured or patterned, to prevent any dyes being transferred onto the soap.

If you're interested in my upcoming soap course (it will be a downloadable e-book), please click here or subscribe for updates using the sign-up form on the right.

Friday, April 19, 2013

In My Soap Pot: Unwind and Marrakesh

These are two soaps I made recently. The first one some of you may recognise from a couple of years ago, back briefly as a limited edition. The second one is brand new!

Unwind: lavender, spearmint, peppermint and French green clay. All natural essential oils.
Available from 5th May.


Marrakesh: frankincense, grapefruit, orange and lemon. All natural essential oils.
Available from 6th May.


Monday, April 15, 2013

Back In Action

Our blog is looking a little neglected lately! But we're going to start posting regularly again very soon. Promise!

If you're wondering where all of our old posts have gone ... fear not, we're in the process of recovering them.

In the meantime, keep updated via our twitter and facebook pages.

Friday, July 9, 2010

Soap Techniques: Layering


Layering your soap can make for a pretty design, and is also a good way to achieve a nice-looking soap when if you are using a fragrance oil that moves quickly, because each layer requires a separate trace.


Step-By-Step:
1) Before beginning your batch of soap, weigh your empty soap pot. Write it down on a piece of paper for later.

2) Line your mould and prepare your oils, lye and water as per normal.

3) After mixing your oils and lye water together thoroughly, but BEFORE bringing to trace, weigh your entire soap pot with the raw soap inside. Subtract the weight of your pot from the amount, then divide what's left (what will be your raw soap mixture) by however many layers you would like to make (eg, if doing 3 layers, divide the soap mixture by 3).

4) Pour off the amount of raw soap needed for one layer into a separate pot.

5) Bring the mixture to a light trace, colour and scent as desired.

6) Pour into your mould. Bang the mould on the bench to help spread the soap evenly and to ensure there are no air bubbles. At this point, if you want 'messy' layers, texture the top of the layer. You can also sprinkle some clays or cocoa powder in between at this point to achieve defined 'lines' between the layers.


7) Cover your mould while you trace/scent/colour the next layer so that the mixture in the mould becomes firmer - this will help when you come to pour the next layer.

8) Repeat steps 4-6 for each layer of soap (hint: you may need to quickly wash your stick blender between layers so you don't blend the colours!). If the previous poured layer is still quite soft, gently spoon the next layer over the top so as not to disturb the one underneath.

9) When you're finished pouring all layers, you're done! Insulate for 12-24 hours before cutting into your creation.

Handy Hints:

*If you are using an FO that moves VERY quickly, keep your temps low and don't discount your water for best results.

*For layers with impact, choose contrasting colours, or use dark-to-light colours to achieve a gradient effect.

Wednesday, June 9, 2010

Soap Techniques: Swirling for Beginners

There are lots of different methods around for swirling soap, but one of my favourite, and I think easiest, ways to do this is an In The Pot (ITP) Swirl.


Tips for a great ITP Swirl:


* Only use essential or fragrance oils that you know cause no or little acceleration. Most floral fragrances will not allow for this kind of swirl (although there are other ways around it), and spicy essential oils such as cinnamon and clove can also be fast movers. Lavender EO is well-know for slowing trace so this can be a good one to start with.

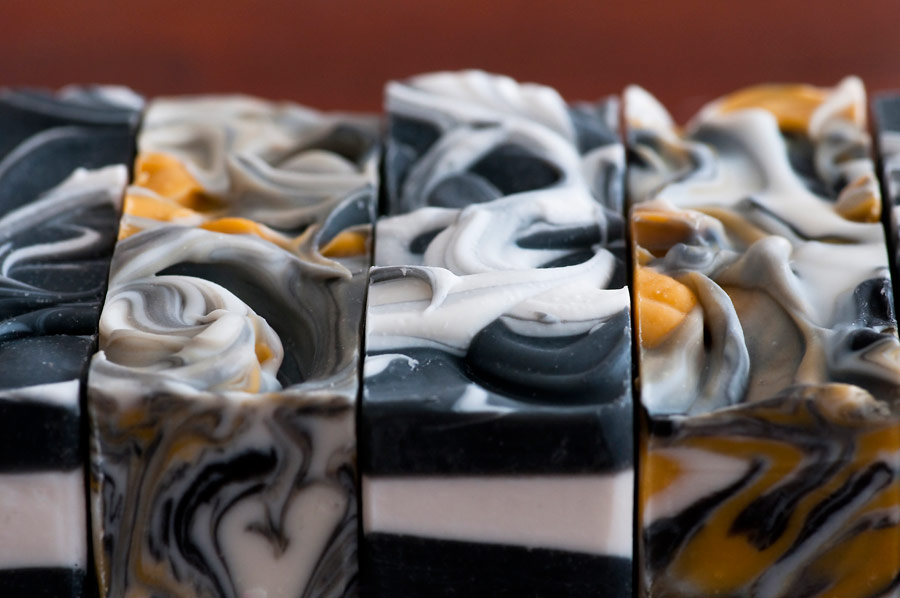
* Choose contrasting colours for a really effective swirl. My favourite combo is a white, cream or pastel base swirled with dark or vibrant colours. These will give the most impact visually.

* Be quick. That doesn't mean racing around like a headless chicken, because you still want to do everything properly and make sure colours/scents are fully blended in your soap. Just have everything be prepared before you start, and move quickly and efficiently.

Step-by-Step Directions

1) After you have mixed the oils and lye water, bring your raw soap to a *light* trace. Every batch will be different, but for me this is about 3-4 quick bursts using the stick blender of about 4 seconds each time, with gentle stirring in between. When you drip soap back onto the base it should just hold its shape, and have the consistency of heavy cream.

2) At this point, you can stir in your essential or fragrance oils. I like to use a whisk to mix it through - make sure it is fully incorporated, but try to be quick.

3) Separate a small amount of raw soap for your swirl. About one quarter or fifth of the batch works best for me. In a 1-kilo (oil weight) batch I would separate 2-3 cups of raw soap for the swirl colour.

4) Colour the separated soap with your desired colour.

5) Then colour your base soap with your desired colour.

6) Pour the small amount of coloured soap back into the main pot, making sure to pour from both high and low points so the swirl colour is incorporated throughout the base.

7) Using a spatula or large spoon, very gently & slowly stir through the soap. Just one or two (at most) stirs around your pot should be enough - more than that and you risk blending the colours together.

8) Pour into your lined mould. Pour in back and forth motions, rather than pouring from just one point, as this will further help the colours to swirl nicely.

9) Insulate as normal and let the soap gel, and leave it to sit for 18-24 hours. Then you come to the best part - cutting into your batch to see how your swirls turned out!

I'd love to see some photos of your swirled soap using ITP or another swirling technique ... post your links below in the comments section :)